JMSK
An MSK modem program that uses the soundcard or an external device
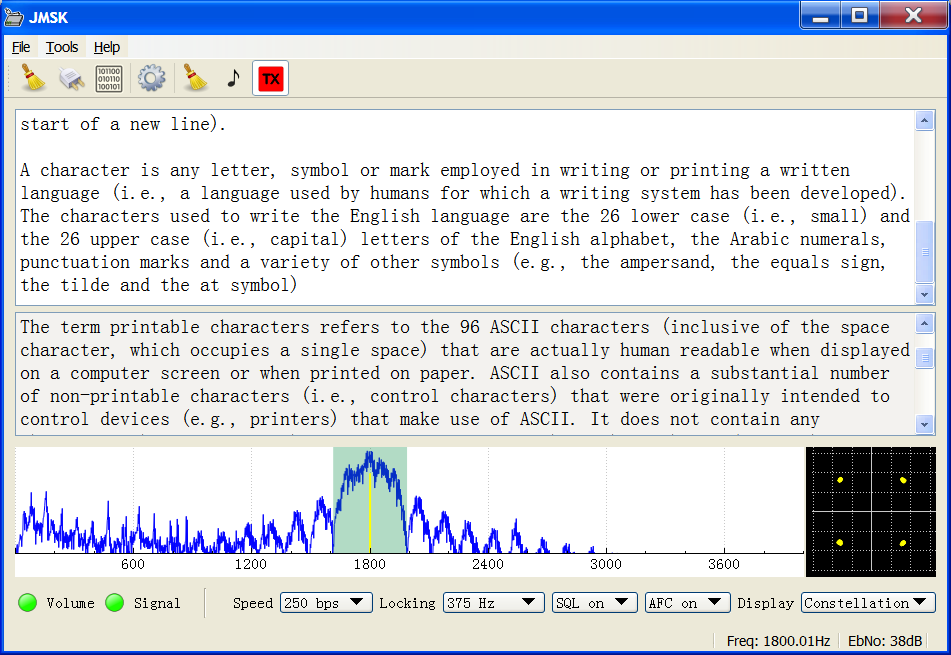
JMSK demodulator
JMSK is a standalone program that can demodulate and modulate MSK (Minimum Shift Keying) signals. Demodulation is performed using the soundcard, while modulation can be either via the soundcard or the via an external device to RF (Radio Frequency) frequencies using some simple hardware. The program implements a good coherent MSK demodulator that has performance comparable to BPSK. It is an open source cross-platform program written in C++ Qt.
MSK has the advantage over BPSK that it has a constant amplitude meaning it is a suitable modulation scheme for nonlinear amplifies. MSK has a steeper spectral rolloff compared to BPSK, as well as modulators can be easier to implement and the same bit error rate in AWGN with respect to energy per bit is identical to BPSK if the demodulator is written well.
The demodulator is implemented using the same technique as was used for the Matlab MSK Demodulator. For a better understanding of the performance of the design of this demodulator it is recommended that the Matlab MSK Demodulator article be read in conjunction with this page.
There are different ways to design an MSK demodulator, some will have awful performance while others will have good performance comparable to BPSK. While almost any FSK demodulator can demodulator MSK, the performance is likely to be poor. I found little in the way of soundcard based MSK demodulators on the net that claimed to be specifically designed for MSK. Of the ones which I did, I was not convinced they where optimal in the sense of BER (Bit Error Rate) versus EbNo (Energy per bit to noise density). As far as I am aware any software that makes a decision of a bit based solely on one symbol is suboptimal. JMSK is a coherent demodulator that uses two symbols to make a decision on the state of a bit. The following figure shows the BER versus EbNo in AWGN (Additive White Gaussian Noise) performance of JMSK by using simulations obtained from the Matlab implementation.

Simulation of JMSK BER versus EbNo in AWGN Performance along with DBPSK for comparison
The red line in the previous figure is likely the performance of implementations of protocols such as PSK31.
MSK is not MFSK; they are totally different schemes. MSK stands for minimum shift keying while MFSK stands for multiple frequency shift keying. MFSK uses multiple frequencies while depending how you look at it MSK uses 1 or 2 frequencies.
The modulator can either output audio frequency MSK to the soundcard which is suitable for devices such as SSB transmitters that can be controlled via serial PTT (push to talk), or alternatively can be connected to simple hardware such as consisting of an Arduino and an AD9850 module as described in the JDDS-Arduino section on GitHub to directly modulate RF waves.
There is currently no interleaving or FEC (Forward Error Correction) and therefore is compatible with other applications that can modulate MSK with Varicode such as Spectrum Lab. This is convenient for testing and comparison purposes.
The modulator can act as a beacon, has the ability to send highly customized preambles and postambles with a simple scripting language, along with dynamic conclusions and web scraping ability. The manual for the latest version of JMSK can be found on the GitHub wiki.
The web scraping ability allows the creation of beacons that produce dynamic content rather than static content. For example, if you want a beacon to include the time, temperature, and wind speed you can write something like...
The time is [time] and the temperature is [temp]C with a [wind] wind.If the web scraping has been set up correctly for your location it will transform this into the correct information for your location and will change for each beacon. The following video shows how this can be done.
Example of how to use dynamic inclusions
400m distance test at 30 MHz
JMSK can output either audio MSK to the soundcard or RF to some external device. Using an Arduino and a AD9850 module that I bought off eBay I put these together as the following schematic depicts. This allows JMSK to directly modulate RF signals up to about 40 MHz.

Schematic of a JDDS device
Apparently the filter that comes with the AD9850 modules has a to high frequency low pass cut off and has an output impedance of 200 ohms ( see DDS Generator Filter ). Despite that I wanted to see how far the AD9850 module could transmit without doing any soldering using just a couple of pieces of wire attached to the sine wave outputs. I connected two 2.4 meter wires to OUT1 and OUT2 and another two 2.4 meter wires to an RTL-SRD dongle (For those who don't know RTL-SRD these are just TV receiver dongle's for computers, using programs such as SDR Sharp they can be made to receive all sorts of RF frequencies). Setting JMSK to 50 buad I got a distance of 400 m through a small hill. I was quite surprised that such a distance could be obtained without any modification to the AD9850 module.
Making a clean signal from DDS chips
The raw output from DDS ( Direct Digital Synthesis ) chips are notoriously bad with lots of spurious signals. Therefore it’s imperative to clean up the signal from the DDS chip before sending the energy into an antenna. What’s typically done is insert a filter between the DDS chip and the amplifier and another filter between the amplifier and the antenna.
The AD9850 DDS modules is found for sale on the Internet have an incorrect LPF ( Low Pass filter ) with a bandpass of 73MHz 1. The AD9850 data sheet suggests a 45MHz LPF 2.
The second problem that the AD9850 modules have is that they have been designed for the square wave output function and not designed to have any external load placed on the sinewave output pins. This can be seen by comparing the AD9850 module schematic with “Figure 17. AD9850/CGPCB Electrical Schematic” as found in the AD950 chip data sheet 2. The following figure shows the schematic of the modules.
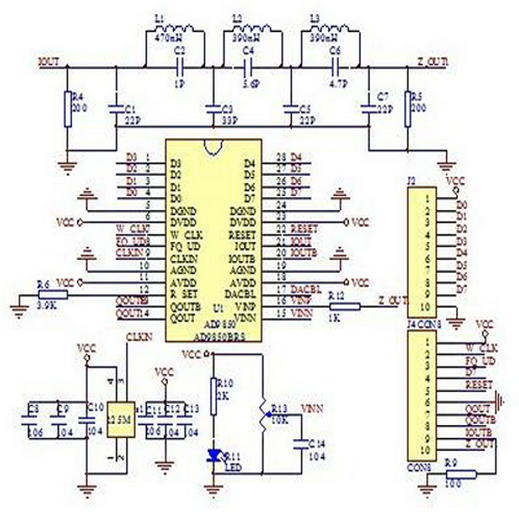
AD9850 module schematic
As can be seen there is a 100 ohm resistor (R9) placed on one of the sine wave output pins IOUTB, while there are two 200 ohm resistors in parallel (R4 and R5) connected to the other sine wave output pin IOUT. The two 200 ohm resistors in parallel mean the AD9850 chip sees 100 ohms on both of its output pins as it should. In addition the filter has an input and output impedance of 200 ohms so no load can be placed on ZOUT. IOUTB is unfiltered and shouldn’t be used. In this design they take a small amount of power from ZOUT through R12 to the AD9850 comparator (VINP) so as to produce the square wave outputs at QOUT and QOUTB. Really it’s a bit of a mucked up design. Hence the reason people such as RudolfReuter have removed the filter and replaced it with a suitable one for sinewave output.
Rather than replacing the filter entirely you can remove R5 and use your own 200 ohm load instead. This should have more spurious then if you were to use a correct filter design but at least the 125 MHz signal from oscillator will be greatly reduced. Generally devices have inputs of 50 ohms so the 200 ohm impedance needs to be changed to one of 50 ohms.
Removing R5, impedance matching the ZOUT pin from 200 ohms to 50 ohms, amplifying the signal then finally filtering it before delivering it to the antenna was my method of producing an on air signal.
Removing R5
Soldiering iron, gone.
200 to 50 ohm match
Initially I used a Pi match that I had not created particularly well. Later I changed to a hi pass L match that I constructed more accurately.
Amplification
A general-purpose low power (<1Watt) linear amplifier.
Filtering
A 4 stage Cauer BPF ( Band Pass Filter ) designed using Elsie.

Filter schematic
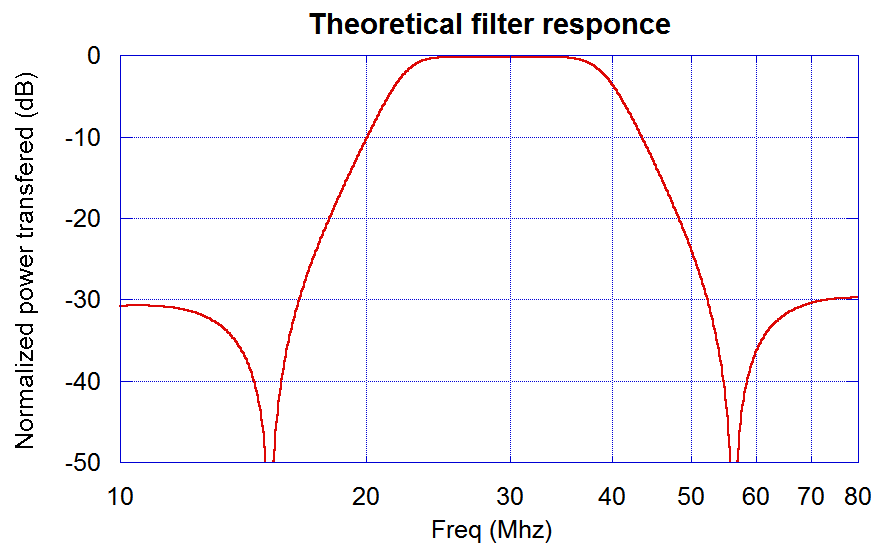
Theoretical filter response
Antenna
30MHz half wave Dipole with balun.
Measurement and design validation
My only method to measure RF power is by a diode and a capacitor over a dummy load attached to a multimeter; this makes it difficult or impossible to measure powers less than say a milliwatt I have found. After the L match I was unable to measure anything. I could however measure a small amount of power in the sub 100 mW power level after the amplifier.
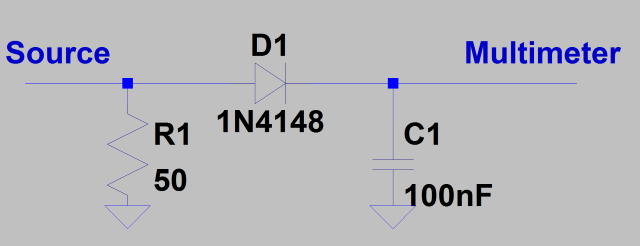
Simple power meter used
Using the initial Pi matching and without the BPF, adjusting the DDS chip frequency I plotted the power as calculated by the power meter to obtain the following figure.
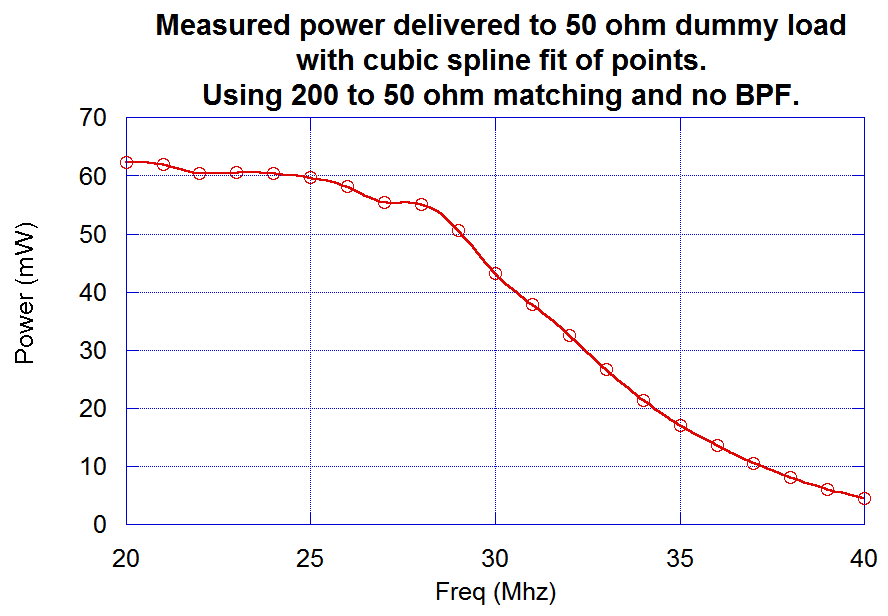
Measured power without BPF and initial Pi matching
While the power should decrease as frequency approaches the maximum limit of around 40 MHz for the AD9850, it is clear to see that there is a sudden kink just before 30 MHz suggesting that my initial Pi matching was not as good as it should be.
Inserting the BPF and repeating the power measurement procedure I obtained the following figure.
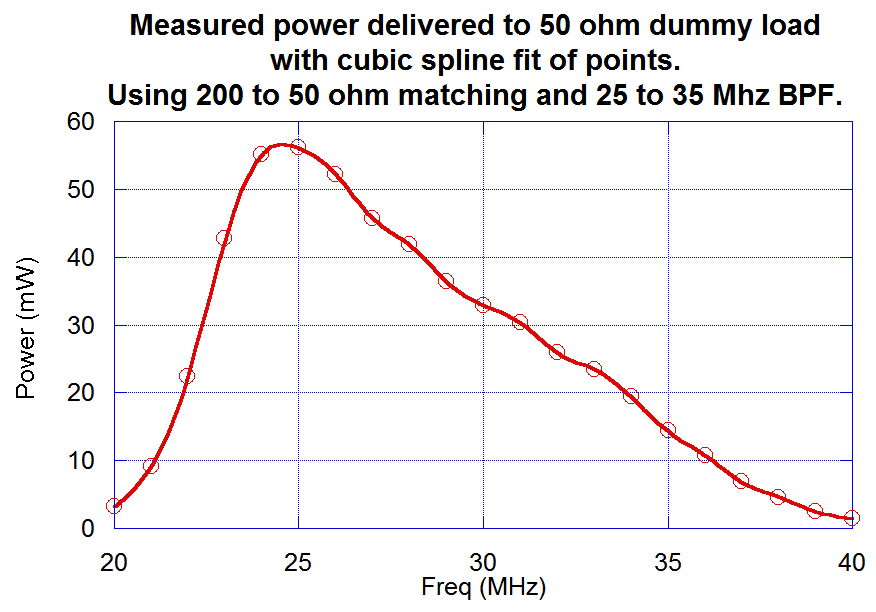
Measured power with BPF and initial Pi matching
Combining these two figures it is possible to calculate the measured frequency response which can then be compared to the theoretical response; this is shown in the following figure. It is interesting to note that this is independent of the matching circuitry or the amplifier gain.
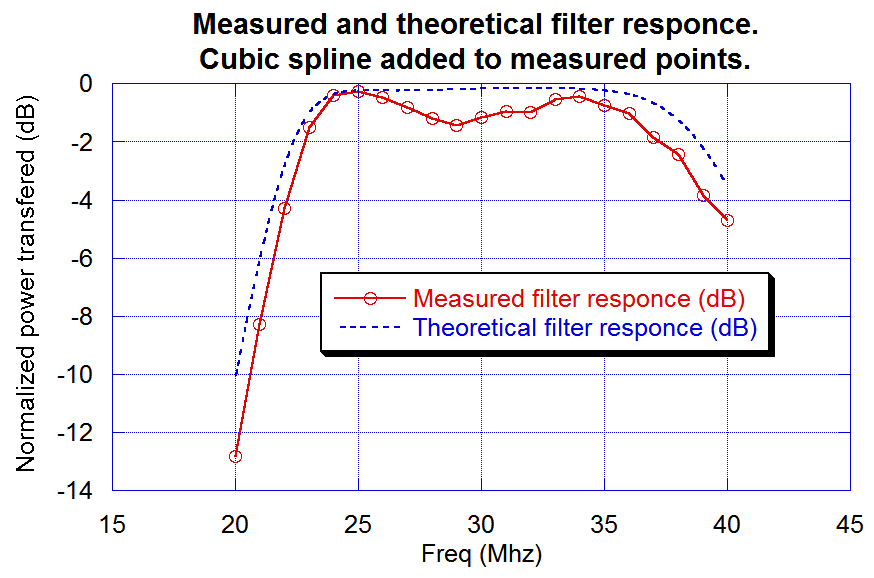
Measured filter response
As can be seen I constructed the filter reasonably accurately. I always find the inductors are the most tricky as they have to be physically made out of winding pieces of wire. The inductors bar one were all air wound and the inductance was measured using my homemade LC meter before use.
As I suspected the initial Pi matching circuit was not constructed well enough I constructed a high pass L matching circuit more accurately and measured the power once again. In the following figure I compare the power measured using the two different types of matching circuits constructed. As can be seen the second circuit that I made, the L match worked better by not attenuating the frequencies between 30 and 35 MHz as much.
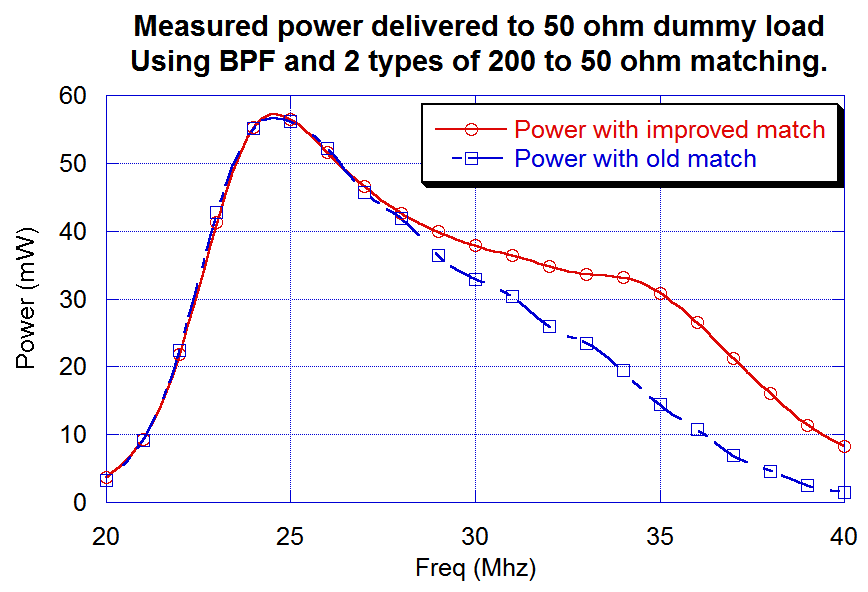
Power measurement using two different matching circuits
So at 30Mhz the power is around the 35mW mark and power varies from 30 to 55mW over the band of interest.
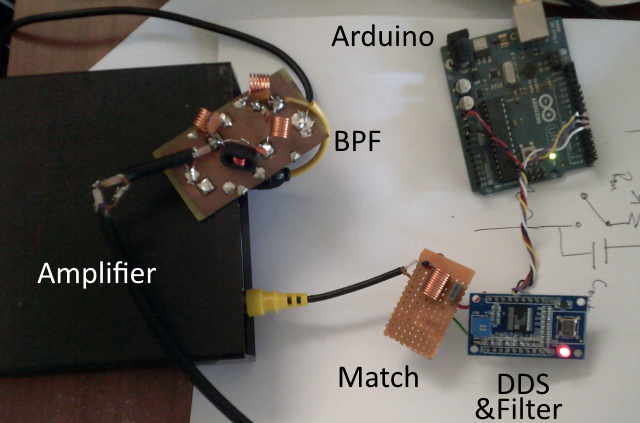
Final hardware (dipole and balun off screen on wall)
1.2km test with JMSK at 50 Baud
As a test I set up JMSK as a beacon at 50 Baud and outputted this data to the hardware just described. Then I traveled 1.2 km to test the signal and how the system performed as a whole.
At 1.2 km the 40mW ish signal was more than adequately loud enough to be received using the RTL-SDR dongle I use to receive radio signals.
I performed the test on a very windy day and was outside with a laptop and a couple of pieces of wire for an antenna. While JMSK demodulated the signal perfectly in between wind gusts, the moment a wind gust happened JMSK’s signal constellation display would turn to what would appear to be a random set of points, which in turn caused a failure of demodulation when a wind gust happened. This was very odd and I can only assume that some loose wire connecting the aerial to the dongle or a loose wire in the dongle itself was to blame for this mysterious phenomenon. Despite the wind related problem, I was very pleased with the results.
Downloads
JMSK is on GitHub as jontio/JMSK. For more information it is highly recommended that you visit this repository. Previous releases can be found on GitHub too.
- Windows 32bit binary MD5: b2f9f0724727eeb4bad26ba5e579b3fb
- Windows 64bit binary MD5: df5126c6250d25fae2360f273ae20391
- Master Source .zip
- Master Source .tar.gz
- View project on GitHub
|
Jonti 2015
Home